
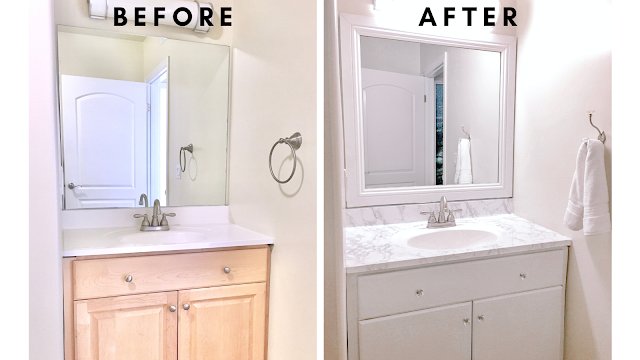
Transforming your cabinet with paint and fresh hardware provides the most effective cheap ways to update an old bathroom vanity in under two days. You can finish the job in about 6 to 8 hours of active work for less than $100. This project suits anyone with a solid, leak-free cabinet frame.
Table of Contents
Cheap supplies to update your vanity

- Bonding primer formulated for cabinets (1 quart covers a standard 36-inch vanity).
- Semi-gloss or satin interior acrylic enamel paint (1 quart).
- Medium 120-grit and fine 220-grit sanding sponges.
- Trisodium phosphate (TSP) cleaner or a heavy-duty degreasing spray.
- 4-inch mini microfiber roller (3/8-inch nap) and a 2-inch angled sash brush.
- New cabinet pulls or knobs that match your existing screw-hole spacing.
- Painter’s tape and plastic drop cloths.
Liquid deglosser works well as a light substitute for initial scuff-sanding, but standard wall paint won’t work because bathroom humidity causes it to peel within weeks. If you find rotten subflooring or cracked pipes during prep, stop immediately and hire a licensed plumber to fix the damage before you start cosmetic work.
Step-by-step
- Empty the cabinet completely and remove the doors and drawers using a manual screwdriver.
- Wash all exterior wood surfaces thoroughly with one gallon of warm water mixed with 1/4 cup of TSP cleaner to remove body oils and soap film.
- Sand every surface lightly using a 120-grit sanding block, working until the clear factory sheen turns dull. Careful: Don’t grind hard on thin laminate or veneer edges, or you’ll tear through the top layer and ruin the core.
- Wipe away the sanding dust using a damp microfiber cloth, then let the wood dry for 20 minutes.
- Apply one thin, uniform coat of bonding primer across all frames, door fronts, and drawer faces using the 2-inch angled brush for corners and the mini roller for flat areas.
- Sand the dried primer after 2 hours with 220-grit sandpaper, then wipe it clean again. Tip: Skipping this intermediate light sanding leaves raised brush marks and dust bumps trapped in your final finish.
- Roll on your first coat of acrylic enamel, keeping your strokes in the direction of the wood grain, and wait 4 hours.
- Apply a second thin coat of enamel and let the pieces cure untouched for at least 48 hours before reattaching the doors. Careful: Mounting hinges before the paint hardens will tear the soft coating right off the edges.
- Install your new hardware pulls using hand tools, adjusting the hinge screws if the doors hang crooked.
Vanity materials and job scope
Your starting material changes the prep steps, drying times, and supply choices needed to finish the vanity.
| Vanity Type | Time and Cost | What Changes | Watch Carefully |
|---|---|---|---|
| Solid Wood | 8 hours, lowest cost | Accepts paint easily with basic scuffing | Wood grain bleeding through pale paint |
| Wood Veneer | 9 hours, low cost | Requires very gentle hand sanding | Flaking edges or lifting glue seams |
| Plastic Laminate | 10 hours, moderate cost | Demands specialty high-adhesion bonding primer | Primer sliding or failing to grip |
| Chalk-Style Finish | 5 hours, low cost | Skips heavy priming but requires a paste wax topcoat | Water spots forming around sink basin rim |
If you have real wood, sand standard surfaces normally; if you have thin laminate, scuff lightly by hand so you don’t ruin the synthetic veneer. The trade-off is clear: keeping the existing surface saves money, but you sacrifice the smooth, uniform perfection of brand-new factory-sprayed cabinetry. This project isn’t for vanities with rotted pressboard or swelling base frames, because degraded wood fibers won’t hold screws or paint. A major mistake is buying new handles without measuring the center-to-center distance between existing holes, which forces you to drill, patch, and repaint mistakes. Remember that curing times vary by paint brand and room humidity, so check the paint can label for exact recoat windows. It’s safer to roll thin coats and add another layer later than to overload the roller and create sagging drips.
How to tell you did it right
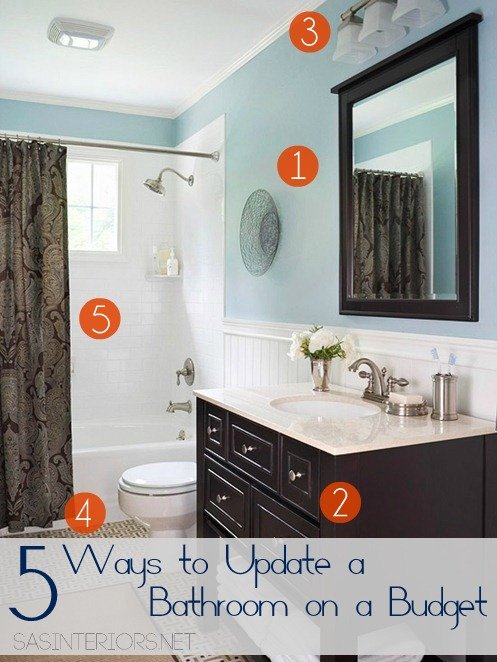
A successful paint job shows a clean, uniform satin or semi-gloss finish with no brush streaks, pooling drips, or sticky spots. By contrast, a poor job looks uneven, shows rough brush ridges, and feels gummy to the touch days later. The most frequent quality problem is peeling paint, especially around the door corners and beneath the sink edge. This failure happens because residual soap scum or grease remained on the surface before priming, preventing the paint film from bonding directly to the base wood. You prevent this failure by washing thoroughly with a degreaser, running a thorough pass with 120-grit sandpaper, and applying an oil-based or dedicated bonding primer before your color coats.
Safety rules and cleanup
Work with windows wide open and run the bathroom exhaust fan to reduce airborne fumes and dust. The U.S. Consumer Product Safety Commission lead guidance warns that homes built before 1978 often contain lead-based paint; never dry-sand an older finish without testing it first.
Seal your leftover paint can tightly, wash synthetic brushes in warm water, and fold drop cloths away from the damp vanity. If your project involves replacing supply valves or hardwired vanity lighting, hire a licensed tradesperson to avoid water leaks or electrical hazards.
Alternate makeover methods
Peel-and-stick vinyl wrap
Cover the vanity base and drawer fronts with waterproof architectural film. This method costs slightly more than a single quart of paint, but it eliminates sanding mess, skips messy liquid odors, and provides a fresh surface in roughly three hours of careful trimming.
Frame-and-trim addition
Glue lightweight pine molding strips or shaker-style trim directly to flat, hollow-core cabinet doors using construction adhesive. This adds about two hours of cutting and measuring, but it gives flat, dated builder-grade doors a modern dimensional profile for minimal money.
Gel stain over existing finish
Wipe an oil-based gel stain directly over intact wood finishes to darken yellowed oak without stripping the clear coat. It requires about four hours of drying time per coat, completely changes the vanity tone, and preserves visible natural grain lines underneath.
Frequently asked questions
Can you paint a bathroom vanity without sanding?
Yes, you can use a liquid deglosser followed by an extreme-adhesion bonding primer. However, a fast hand scuff with 120-grit sandpaper creates mechanical grip that prevents your new paint from chipping off high-contact edges over time.
How do you update bathroom vanity handles that don’t fit?
Fill the old screw holes with two-part wood filler, let it dry for two hours, sand it flat, and drill fresh holes matching your new hardware spacing. You must prime and paint over the patched area to hide the repair.
Is chalk paint durable enough for a bathroom vanity?
No, standard chalk paint remains too porous for damp bathroom spaces on its own. If you use chalk-style paint, you must apply two coats of water-resistant clear polycrylic topcoat to stop moisture from softening the finish.
What happens if you skip primer on a vanity?
The paint will bubble and peel away in large sheets within months. Raw wood absorbs the moisture unevenly, while factory-sealed cabinets repel water-based paint without a dedicated primer layer bonding the two surfaces together.
Can you put peel-and-stick paper on a vanity top?
Yes, heavy-duty waterproof vinyl works on flat, non-porous laminate countertops as a temporary fix. It resists minor splashes, but standing water near the faucet base or hot curling irons will eventually cause the vinyl seams to peel.
Final Thoughts
Once everything is dry and the new handles are secure, take a step back to admire your hard work. You’ll be surprised how much brighter the room feels. Since you’ve already refreshed the vanity, consider adding a new mirror or some soft towels to complete the look. You’ve earned it!
Related guides
- 5 Modern Vanity Styles That Fit Small Bathrooms: Chic Solutions
- Bathroom Sink Stopper Replacement: A Simple DIY Guide
- Bathroom Light Fixtures Over Mirror: The Complete Guide






